Lesson 04: Understanding the Do-While Loop Structure

Lesson 68/93 | Study Time: 30 Min
Lesson 04: Understanding the Do-While Loop Structure


Learning Outcomes:


i. Identify the components of a do-while loop structure.


ii. Understand how the do keyword and while keyword work together.


iii. Explain why the do-while loop guarantees at least one loop execution.


iv. Analyze and explain practical examples of do-while loop usage.


Introduction:


Remember the counting champion and the adventurer from the previous lessons? Today, we meet another loop friend who's a bit different, but equally helpful - the do-while loop! Think of it as a cautious explorer who takes a peek before setting off. It always takes at least one step before checking if it needs to turn back.


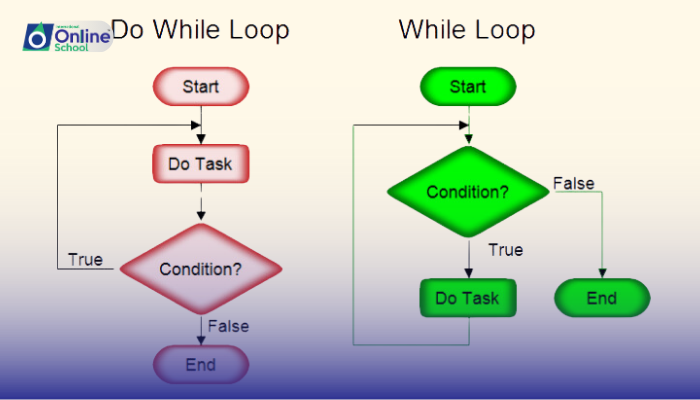
i. Inside the Do-While Loop:


Imagine you're crossing a busy market. You wouldn't just jump in blindfolded, right? The do-while loop is like carefully stepping into the crowd first, and then looking for a way out. Here's what makes it tick:


Do Keyword: This is like putting your foot forward, taking that initial step into the market.


Body of the Loop: This is navigating the crowd, doing whatever you need to do inside the market (the actual instructions in code).


While Keyword: This is like stopping to check if you've found the exit.


Test Expression: This is asking, "Can I leave the market yet?" If the answer is true, you're done looping.


Statement Terminator: This is like stepping out of the market, marking the end of the loop.


ii. Guaranteed First Step:


Here's the coolest part about the do-while loop: it always takes at least one step before checking the exit! Even if the answer to "Can I leave?" is immediate, it still completes the first loop iteration. Think of it like taking a quick look around the market before deciding to stay or go.


Looping Examples:


Let's see how this works in code:


Python


guess = 0


do:


  print("Guess the secret number (1-10):")


  guess = int(input())


while guess != 7:


  print("Try again!")


print("Congratulations! You guessed the number!")


This loop first prompts the user for a guess (taking that initial step). Then, it checks if the guess is correct. If not, it keeps looping without even leaving the "market" (reprinting the prompt) until the user guesses right. This ensures at least one guess is made before checking the answer.


iii. Beyond Market Adventures:


Do-while loops aren't just for cautious shopping! They can be used for any situation where you need to do something at least once and then keep going based on a condition, like:


Checking user input until it's valid


Reading data from a file until it's finished


Jumping down a platformer game level at least once


The do-while loop adds another tool to your programming toolbox. It lets you take that initial step before deciding on the rest of your journey, making your code flexible and robust. By understanding its unique behavior and practicing with different examples, you can become a looping master and navigate any programming challenge with confidence! Remember, the do-while loop is your cautious friend, always ensuring you start your exploration on the right foot. Now go forth and loop with wisdom!


Saboor Ali

Saboor Ali

Product Designer

Class Sessions

1- Lesson 01: Problem Definition 2- Lesson 02: Problem Analysis 3- Lesson 03: Planning Solutions 4- Lesson 04: Candid Solutions 5- Lesson 05: Evaluating Solutions 6- Lesson 06: Introduction to Algorithms 7- Lesson 07: The Role of Algorithms in Problem Solving 8- Lesson 08: Criteria for Measuring Efficiency 9- Lesson 09: Basic Arithmetic Operations 10- Lesson 10: Decision Making in Algorithms 11- Lesson 11: Physics Applications of Algorithms 12- Lesson 12: Geometric Algorithms 13- Lesson 13: Area Calculation Algorithms 14- Lesson 14: Educational Grading Algorithm 15- Lesson 15: Financial Algorithms 16- Lesson 16: Exponential Calculation 17- Lesson 17: Sequence Generation Algorithms 18- Lesson 18: Counting Multiples Algorithms 19- Lesson 19: Multiplication Table Algorithm 20- Lesson 20: Temperature Conversion Algorithms 21- Lesson 21: Odd and Even Number Algorithms 22- Lesson 22: List Manipulation Algorithms 23- Lesson 23: Greatest Common Divisor (GCD) Algorithm 24- Lesson 24: Prime Number Algorithms 25- Lesson 25: Introduction to Flow Charts 26- Lesson 26: Importance of Flow Charts in Problem Solving 27- Lesson 27: Requirements Determination in Flow Charts 28- Lesson 28: Flow Chart Symbols 29- Lesson 29: Drawing Flow Charts of Algorithms 30- Lesson 01: Understanding Computer Programs 31- Lesson 02: Levels of Programming Languages 32- Lesson 03: Characteristics of High-Level Languages 33- Lesson 04: Popular High-Level Programming Languages 34- Lesson 05: Compiler vs. Interpreter 35- Lesson 06: Introduction to Integrated Development Environments (IDE) 36- Lesson 07: Components of C Programming Environment 37- Lesson 08: Introduction to Programming Basics 38- Lesson 09: Comments and their Purpose 39- Lesson 10: Constants and Variables 40- Lesson 11: Data Types in C 41- Lesson 12: Type Casting and Constant Qualifier 42- Lesson 13: Declaring and Initializing Variables and Constants 43- Lesson 01: Output Functions in C 44- Lesson 02: Input Functions in C 45- Lesson 03: Statement Terminator and Format Specifiers 46- Lesson 04: Escape Sequences in C 47- Lesson 05: Introduction to Operators 48- Lesson 06: Arithmetic Operators in C 49- Lesson 07: Assignment and Increment/Decrement Operators 50- Lesson 08: Relational Operators in C 51- Lesson 09: Introduction to Logical Operators 52- Lesson 10: Practical Use of Logical Operators 53- Lesson 11: Differentiating Assignment and Equal To Operators 54- Lesson 12: Unary and Binary Operators 55- Lesson 13: Ternary (Conditional) Operator 56- Lesson 14: Order of Precedence of Operators 57- Lesson 01: Introduction to Control Structures 58- Lesson 02: Understanding Conditional Statements 59- Lesson 03: Structure and Use of if Statement 60- Lesson 04: Structure and Use of if-else Statement 61- Lesson 05: Understanding the Switch Statement 62- Lesson 06: The Role of Break in Switch Statement 63- Lesson 07: Nested Selection Structures 64- Lesson 08: Differentiating Among Selection Structures 65- Lesson 01: Introduction to Loop Structures 66- Lesson 02: Understanding the For Loop Structure 67- Lesson 03: Understanding the While Loop Structure 68- Lesson 04: Understanding the Do-While Loop Structure 69- Lesson 05: Use of Break and Continue Statements 70- Lesson 06: Differentiating Among Loop Structures 71- Lesson 07: Introduction to Nested Loops 72- Lesson 01: Introduction to Data Representation 73- Lesson 02: Understanding Logic Gates 74- Lesson 03: Truth Tables and Additional Logic Gates 75- Lesson 04: Conversion of Boolean Expressions to Logic Circuits 76- Lesson 05: Introduction to K-Maps 77- Lesson 06: Simplification of Two and Three Variable Boolean Functions 78- Lesson 07: Building Logic Circuits from Simplified Expressions 79- Lesson 01: Introduction to the World Wide Web 80- Lesson 02: Types of Websites 81- Lesson 03: Introduction to HTML 82- Lesson 04: HTML Elements and Tags 83- Lesson 05: Text Formatting Basics 84- Lesson 06: Text Formatting Tags 85- Lesson 07: Detailed Text Formatting 86- Lesson 08: Creating Various Lists 87- Lesson 09: Adding Images and Borders 88- Lesson 10: Applying Background Colors and Images 89- Lesson 11: Introduction to Hyperlinks 90- Lesson 12: Creating Graphical Hyperlinks 91- Lesson 13: Creating Tables 92- Lesson 14: Introduction to Frames 93- Lesson 15: Creating Framesets with Multiple Frames